No, I'm not talking about the Presidential election. I'm talking about CP vs MP. For all you non-soapers, that's cold processed vs melt and pour. Cold processed is the method of combining oils (the same kind found in your kitchen or grocery store shelves), water, and lye until they saponify (that's the chemical reaction these ingredients undergo to form what we know as soap.) Melt and pour is just that: The saponification process has already occurred, and you're taking a block of premade soap and melting it down to add your own special touches.
There are many different kinds of mp soap on the market, but not all brands are made equally. I personally love mp because it's quick. It's easy. More importantly, for me, it's versatile. I love using shaped soap molds to make what I call soap creations. You can embed things in it. You can use additives such as herbs and salts. You get the point. BUT.... not all mp soaps are the same. There are many different brands on the market, and many of these brands contain stuff I can't even pronounce. For that reason, I only use what's called natural or organic soap-no sulfates or foaming agents. They can be very drying which is why extra glycerin is added to mp soap.
CP soap, on the other hand, is made from scratch. They're unique in appearance, color, and texture. No two batches will hardly ever look the same. There are dozens upon dozens of different oil and butter combinations you can use to make cp soap. That's where the science of soap comes in. It can be dangerous because it involves the use of lye or sodium hydroxide. You must wear protective gear whenever making soap from scratch. You must never attempt to make soap from scratch with children or pets around (I'm not saying if you have children or pets, do not make cp soap. I'm saying, don't have them in the same area when making soap.)
Okay, I'm getting off my "soap box." I just had to put it out there that I believe mp is real soap, and that you have choices-not only as a soap maker, but a lover and buyer of soap. Now, go wash your ___________________.

Showing posts with label Soap-making. Show all posts
Showing posts with label Soap-making. Show all posts
Wednesday, September 24, 2008


Sunday, August 31, 2008
How To Make Soap-The Tyler Durden Way
One of my favorite movies is Fight Club. It's gory, it's grimy, but it's also funny. One of the funniest scenes is the scene where Tyler Durden (played by the delicious Brad Pitt) explains to the Narrator (played by the un-sexy, sexy Ed Norton) how to make soap. He renders tallow, er fat, by.....Well check this scene out for yourself.
If you have a weak stomach or no sense of humor, you may not want to watch this.
Monday, August 25, 2008
Must....Make....Soap........!

I'm shaking from the withdrawal. I haven't made any soap in about three weeks? That last batch discouraged me greatly so I backed off (and I'm running low on soaping oils.) I did make a small batch yesterday that I call Summer's End. I wanted to give it a rainbow effect, but it didn't quite pan out that way. I used olive oil, coconut oil, and castor oil. While I'm not pleased with the aesthetics of it, I do like the way it smells. The FO I used is from Day Star Supplies, and it is a blend of pineapple, orange, guava, papaya, with a hint of vanilla and coconut. They claim there's no discoloration, so I'll be watching this one closely. Here's a pic, but again, I'm not thrilled with the "look" of it.
Wednesday, August 13, 2008
Mac and Cheese Anyone?

On a more positive note, I got my pillar wax today from Candle Science, so I'm making flames! Check in with ya'll later.
Tuesday, August 12, 2008
Making Lemonade
It's so funny how when I'm making candles, all I can think about is making soap, and when I'm making soap, all I think about is making candles. It's a sick obsession I tell you. I haven't made any CP soap in about two or three weeks, and I'm having serious withdrawal. I've been busy making soap favors for Rochelle's baby shower (I'll post on that next week) and I've been voraciously cleaning my apartment. I've promised to not do any more crafting in the kitchen-except to melt wax on the stove. Everything else will be done in my dining room/studio from this point on.
So in parting: When life gives you lemons, just make lemonade. Next up: Banana Split. I'm going to try layering. Wish me luck!
I've made two batches of soap this week, and neither has turned out like I want. I used the rest of my SoapQuick from Mission Peak Soap (Check out my older posts for the lowdown on SoapQuick.) I really like that this is a pre-blended mix of oils. It's a lifesaver for experimenting and/or cranking out mass quantities of soap. I'm a small-batch gal because I feel my skills are not yet to the level where I feel I can sell a lot of CP soap, but don't get it twisted, my soap is sell able, usable, and lovable:-). I just haven't mastered the art of the swirl or layering yet, but I'm working on it!


So in parting: When life gives you lemons, just make lemonade. Next up: Banana Split. I'm going to try layering. Wish me luck!
Monday, July 28, 2008
A Little Sweet Potato Swirl
I've had a whirlwind weekend. I was gettin crafty in my kitch. I made two batches of soap, Harvest Spice and Blackberry Vanilla. I cannot master the art of the swirl to save my friggin life! I just take my chances and roll with it. The Harvest Spice & Apple is quite lovely. I bought it from Candles & Supplies, and I've had it for a few months now. I swear I can't smell any apple in it which is why I dropped the "apple" from the name. It smells like a freshly-baked sweet potato pie with brown sugar, cinnamon, and nutmeg. It's the perfect fall fragrance, and it'll be cured just in time for fall. Here's a pic. I can't wait to try this one!
ps-I'll post the Blackberry Vanilla in a day or two.
ps-I'll post the Blackberry Vanilla in a day or two.

Tuesday, July 22, 2008
Feelin' Spicy!
For some reason I always have it in my head that soaps have to be sweet and/or flowery, but I'm a hot, saucy chick. Why can't my soaps reflect a little of that? Don't get me wrong, I love the fruity, feminine concoctions out there, but there's something about fragrances like ginger, black pepper, licorice, and bay rum that turn me on. Maybe it's the masculinity of these spices or maybe it's because they're so "anti-feminine" (whatever that means.)
I've been inspired to reach out to my inner spice and create some lathers that are "manly feminine." My first creation is something I call Hot, Hot Delivery Guy. It's a heady blend of ginger and lime that I picked up from Daystar Supplies. They call it Ginger Lime, but that's so obvious. This scent is so seductive to me. It's masculine. It's feminine. It's.....different. I haven't tried it in CP soaps yet, but it's very strong in the MP brand I use from SFIC Corp. I'm using an oatmeal base here, and I sprinkled a little silver mica on top for kicks. Smells great on my skin!
I've been inspired to reach out to my inner spice and create some lathers that are "manly feminine." My first creation is something I call Hot, Hot Delivery Guy. It's a heady blend of ginger and lime that I picked up from Daystar Supplies. They call it Ginger Lime, but that's so obvious. This scent is so seductive to me. It's masculine. It's feminine. It's.....different. I haven't tried it in CP soaps yet, but it's very strong in the MP brand I use from SFIC Corp. I'm using an oatmeal base here, and I sprinkled a little silver mica on top for kicks. Smells great on my skin!

Sunday, July 20, 2008
New Suppliers
As much as I believe in loyalty and the "If it aint broke..." mantra, I'm always in search of something bigger and better. I guess those aren't the right choice of words. What I really mean is I'm always in search of something more efficient and cost-effective. While I believe in quality to the utmost, I'm a struggling artist, so I've gotta make my dollars work for me. I'm really starting to step up my CP making game, and I need oils-a small arsenal at a relatively small price.
I happened to be flipping through some of my old Saponifier mags, and I saw this add for Columbus Foods. What an obvious place to look for wholesale soaping oils. I have yet to find a site where you can buy 7 pounds of olive oil for less than $15.00. If you know of one, please let a sister know! Anyhoo, I go on a spree. They sell the oils in 7 pound increments, so I buy pomace olive oil, palm kernel oil, Castor oil, coconut oil, and rice bran oil. With shipping, I spent about 80 bucks. Not bad for 35 pounds of oil. When I finally get the delivery, I don't know what I was expecting, but what I have are 5 big yellow jugs. They remind me of anti-freeze containers. I'm so excited. I can't wait to start soaping. I immediately make two batches-a coconut lime shampoo bar and a concoction I call Sweet Sticky Thing. I'll post pics in a few days, but I encourage you to look at Columbus Foods if you haven't already.
I happened to be flipping through some of my old Saponifier mags, and I saw this add for Columbus Foods. What an obvious place to look for wholesale soaping oils. I have yet to find a site where you can buy 7 pounds of olive oil for less than $15.00. If you know of one, please let a sister know! Anyhoo, I go on a spree. They sell the oils in 7 pound increments, so I buy pomace olive oil, palm kernel oil, Castor oil, coconut oil, and rice bran oil. With shipping, I spent about 80 bucks. Not bad for 35 pounds of oil. When I finally get the delivery, I don't know what I was expecting, but what I have are 5 big yellow jugs. They remind me of anti-freeze containers. I'm so excited. I can't wait to start soaping. I immediately make two batches-a coconut lime shampoo bar and a concoction I call Sweet Sticky Thing. I'll post pics in a few days, but I encourage you to look at Columbus Foods if you haven't already.
Tuesday, July 15, 2008
Well, It's Not A Total Loss
Hey Cool People,


I'm ready to reveal the "Why Didn't I Think Of That" soap. While I'm not thrilled with the results, I'm not totally disappointed either. As you'll recall (if not, read the previous post), I attempted to swirl with pre-colored M&P Soap. Lemme tell you this: Lye is a killer-figuratively and literally speaking. The M&P soap added to my raw soap mixture sank straight to the bottom of the mold, so my soap has a hard, purple-ish layer on top. I'm glad I didn't use "good" oils like olive oil. I would have been thoroughly pissed. What I did use was hydrogenated soybean oil and canola oil. That's it. I used no "hardening" oils like cocoa butter, palm oil, or coconut oil-because I had none-LOL!!! My soap was really soft, almost mushy when I took it out of the mold. I thought it was a total loss, but I shaped it up a little, and it aint half bad. Here it tis. Stay tuned for the next disaster, I mean, project!


Sunday, July 13, 2008
Now Why Didn't I Think Of That????
I'm a busy woman. If I'm not working my 9-5, I'm working on my side hustle and my pride and joy, The Soap Seduction. I am always on the lookout for useful tips and tricks that make the creative process easier and more efficient. Here's one that is so simple, I can't believe I didn't think of it myself.
One of my biggest challenges when making CP soap is coloring the soap. Either my raw soap is too thick or the color I choose does not take to the pH levels of the soap and it turns a totally different color. Well, I learned how to combat that to some degree by incorporating this smart trick: Take about 6 oz (more or less depending on the size of your batch) of M&P soap and color it your desired shade. Add it to your raw soap or use it to create your swirls, and VOILA! You have the perfect shade. I'm making a batch of soap now using this technique, and I shall reveal the results tomorrow. I'm keeping my fingers crossed.
One of my biggest challenges when making CP soap is coloring the soap. Either my raw soap is too thick or the color I choose does not take to the pH levels of the soap and it turns a totally different color. Well, I learned how to combat that to some degree by incorporating this smart trick: Take about 6 oz (more or less depending on the size of your batch) of M&P soap and color it your desired shade. Add it to your raw soap or use it to create your swirls, and VOILA! You have the perfect shade. I'm making a batch of soap now using this technique, and I shall reveal the results tomorrow. I'm keeping my fingers crossed.
Monday, June 30, 2008
I've Been Vindicated!!!!
It's just another Manic Monday....Remember that song from the Bangles? Did you know that Prince wrote that? Anyway, the meatloaf soap kinda bummed me out yesterday, so I decided to give it another shot. I changed the formula because I have absolutely no soaping oils in the house so I had to improvise. I call this soap Yahoo for Yuzu. Here's the recipe:
- 24 oz. hydrogenated soy
- 8 oz. cocoa butter
- 10.56 oz water
- 4.142 oz lye (5% superfatted)
- 2 oz Yuzu
- Orange zest dye from Peacock Dyes
- Silicone loaf mold
(Shout out to Brambleberry for having a handing lye calculator on their site)
I have a confession to make: I do not calculate the temps of my oils and lye. I have had really good success (the meatloaf soap doesn't count) adding the lye straight to my liquified oils. One lesson I've learned is once you've added your fragrance, do not use your hand mixer to incorporate the scent. It could accelerate trace. Simply fold the fragrance in with your soaping spoon or spatula (never metal-wooden or plastic is best). Oh, I forgot to mention that I poured about 8 oz of the unscented raw soap in a separate container. I color that with my dye to create swirls (I have yet to master the art of the swirl, but that's another blog post in itself.)
To make a long story short, my Yahoo Yuzu turned out pretty good. My swirls leave little to be desired, but you will probably be seeing this soap on The Soap Seduction. Here is the final result.


Sunday, June 29, 2008
Eww!!!!
I was really in the CP (that's cold-pressed for all you non-soapers) soap-making mood yesterday, and I thought I'd experiment a little. I had two new bottles of lye, but no really good soaping oils, but what the heck, I had nothing but time. I decided to work with what I had in my kitchen and use some leftover oils from other projects. So the recipe went a little something like this:
- 16 oz. all-vegetable shortening
- 8 oz. hemp oil
- 8 oz. sweet almond oil
- 10.56 oz. water
- 4.127 oz. lye (5% superfatted)
- French vanilla pear FO from Wholesale Supplies Plus
- Green dye
Where did I go wrong? For starters, I used a water based dye. Duh! What was I thinking? When I added the dye to my raw soap, it turned a maroon-ish color. But no, I used it anyway. Hey, aren't Bartlett pears brown? Anyway, I knew I was doomed when I saw my creation turn brown, red, and yellow all at once. But I kept the faith. "It'll be alright," I lied to myself. Well, here is the soap, I mean, oil/lye disaster in all it's glory. Could it have been the oil combo? Or was it the FO? Or was it truly the dye? If someone has some insight, please share. Meanwhile, the meatloaf- shaped atrocity is in the garbage. Happy soaping!


Thursday, March 27, 2008
Always Read The Labels!!!!
I'm ashamed at my recent blunder. I bought this whole apple mold with the intention of making these cute votives. They were so cute, in fact, that I decided to make soaps with them as well. That's all well and good, BUT, not all fragrances are skin-safe. I posted these cute little soaps in my Etsy shop last week and had to remove them a day later. Why? Because my pressed ass did not read the warning on the bottle of the Red Delicious scent I bought from Candles and Supplies. It clearly says not soap and body safe, yet I used it in my soap creation. Thank God nobody bought one of these, or I'd have been in deep doo-doo! I'm still gonna turn these into little apple votives though. I know a few school teachers who would get a kick out of these!
Lesson to self and to others: Always read the labels!
Lesson to self and to others: Always read the labels!

Does It Really Do That????
To my (2) loyal readers, I'm sorry that I haven't posted in a week, but I have a lot going on. Anyway, I've resolved to keep this blog strictly about candle and soap making. No more rants. No more random ridiculousness unless it has to do with soaps and/or candles. With that being said, I have a new soap base that I'm trying out for my favorite specialty soap: Cupcake Soaps. While I love making them and bathing with them, I'm not crazy about the fact that my delicious creations turn brown after 2-3 days. "Why?" Is the soap base rancid or old? Nope. It's the vanilla content. My scent-d'jour, Cupcake, from one of my favorite suppliers Wholesale Supplies Plus, contains 14% vanilla. Holy cow! Now wonder my cupcakes look like doo-doo after a few days. It's starting to affect my sales, and I've got to do something quick. To combat this dilemma, I've invested, ok bought, two new products that I'm hoping will be the cure-all to my doo-doo soap blues.
The first product I bought is a vanilla-stabilizing M&P base from Natures Garden. This base is made with 99.5% glycerin and deodorized, double-distilled coconut oil, and Vitamin E. They actually had me at $4.25 for two pounds, but I'll take the double-distilled coconut oil. Anyhoo, I'm a little pissed at myself for buying four 2-lb slabs of this base because one, I've never tried it, and two, it's transparent (my fault for not reading the descriptions carefully.) I put a few chunks in my Pyrex cup and zap it in my microwave for about a minute, and it's now a yellow liquid. I'm slightly panicking at this point because I don't want a translucent cupcake soap, so I'm fully disclosing now that I've added a few small cubes of cocoa butter M&P soap from one of my other fave suppliers Candles and Supplies. Even after that, the soap is still too clear, but I proceed with what I have. The good news is I don't have to color this soap because it's already a light yellow. After I release the soap from my mold, I hook up some "icing" to pour over the soap. It too is also translucent. I'm not happy folks. Let's move on, shall we?
The second product I bought was from Wholesale Supplies Plus. It's a liquid additive actually called Vanilla Stabilizer. I was reading the ingredients list, and guess what it contains? Vitamin E! You simply add a tablespoon for every pound of soap. Since I'm only making one cupcake for now, I added about 2 teaspoons to 8 oz of soap. To that, I added a tablespoon of Cupcake fragrance. Yeah, yeah, it's a lot of fragrance, but I love this scent, what can I say. It literally fills my apartment with the scent of freshly-baked cupcakes. I color the soap with a tiny drop of yellow dye. My icing is used with the same soap base only I added a tiny drop of red and came out with this pinky-peach color.
Now for the test: I present 3 cupcakes: one using the vanilla-stable soap base, one using the vanilla stabilizing additive, and one using nothing. I'll post an update on Saturday to show how these soaps turned out. The soap on the left is the pre-made base. The soap on the right is my beloved cocoa butter M&P with no additives, and the soap in the back is the cocoa butter M&P with the the vanilla stabilizer added. I'm dying with anticipation to see how these turn out!


The first product I bought is a vanilla-stabilizing M&P base from Natures Garden. This base is made with 99.5% glycerin and deodorized, double-distilled coconut oil, and Vitamin E. They actually had me at $4.25 for two pounds, but I'll take the double-distilled coconut oil. Anyhoo, I'm a little pissed at myself for buying four 2-lb slabs of this base because one, I've never tried it, and two, it's transparent (my fault for not reading the descriptions carefully.) I put a few chunks in my Pyrex cup and zap it in my microwave for about a minute, and it's now a yellow liquid. I'm slightly panicking at this point because I don't want a translucent cupcake soap, so I'm fully disclosing now that I've added a few small cubes of cocoa butter M&P soap from one of my other fave suppliers Candles and Supplies. Even after that, the soap is still too clear, but I proceed with what I have. The good news is I don't have to color this soap because it's already a light yellow. After I release the soap from my mold, I hook up some "icing" to pour over the soap. It too is also translucent. I'm not happy folks. Let's move on, shall we?
The second product I bought was from Wholesale Supplies Plus. It's a liquid additive actually called Vanilla Stabilizer. I was reading the ingredients list, and guess what it contains? Vitamin E! You simply add a tablespoon for every pound of soap. Since I'm only making one cupcake for now, I added about 2 teaspoons to 8 oz of soap. To that, I added a tablespoon of Cupcake fragrance. Yeah, yeah, it's a lot of fragrance, but I love this scent, what can I say. It literally fills my apartment with the scent of freshly-baked cupcakes. I color the soap with a tiny drop of yellow dye. My icing is used with the same soap base only I added a tiny drop of red and came out with this pinky-peach color.
Now for the test: I present 3 cupcakes: one using the vanilla-stable soap base, one using the vanilla stabilizing additive, and one using nothing. I'll post an update on Saturday to show how these soaps turned out. The soap on the left is the pre-made base. The soap on the right is my beloved cocoa butter M&P with no additives, and the soap in the back is the cocoa butter M&P with the the vanilla stabilizer added. I'm dying with anticipation to see how these turn out!


Tuesday, March 11, 2008
The Big Reveal-Ashy SoapQuick
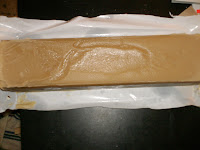
Well here we are on Tuesday, and I made my soap using the SoapQuick on Saturday, and while I'm not doubled over with joy, I 'm not disappointed either. This particular batch was a personal challenge because I was expecting the worst, yet it didn't totally tank. Notice the top of the soap log has an ashy appearance. That's called soda ash, and it's perfectly harmless. This can often happen when your soap comes in contact with the air while it's still in your mold saponifying. I'll cut that off and neaten it up. My one regret is I wished I used a little more fragrance and some color. This soap is totally colorless. It looks so blah. The soap is still kinda soft and it has a slight sting when I touch my tongue to it. This means my soap is not yet ready for use. I'm now "curing" it by letting it dry out and harden. I don't have a fancy dryer. What I'll do is put it on an unused rack from my oven and store it in my linen closet. I'll rotate the bars every other day so that it will cure evenly. Well, here it is. I'll keep you posted on the final results. Smooches!


Sunday, March 9, 2008
SoapQuick-Part Deux
Okay, I'm gonna try my luck with the SoapQuick again. If you remember, I bought this from Mission Peak Soaps, and the first time I tried this, it was a total and utter disaster. I was pissed on a number of levels: One, I ruined a batch of seemingly good soaping oils. Two, I wasted some lye which for some reason is a precious commodity to me. And third, I was just pressed for the soap to turn out wonderfully, but of course, it didn't. Anyway, I decided to give it another try after I bought this fascinating read from Old Crone's Bewitching Bath Soap. The author, Amy, actually says that you don't have to measure the temperature of your oils and lye and that you can pour your lye directly into your oils once the lye has completely dissolved in the water. I am the world's biggest skeptic, so I actually contacted Miss Amy, and she personally confirmed it. No more thermometers!!!! Yes! That was probably my biggest challenge-getting the lye mixture and the oils within a few degrees of one another. I've probably ruined so many batches because of this. Moving on, this time I followed the recommended recipe for the SoapQuick. The recipe is for a 4 lb batch of soap and requires:


- 64 oz of SoapQuick
- 19 oz of water
- 9.2 oz of lye
What I did was weigh out the oils in my large, plastic measuring cup. I didn't actually think it would all fit, but it did. After I weighed the oils, I poured them into my huge bowl that I've designated as my soap-making bowl. Next, I poured the lye mixture directly into the oils. Mind you, the oils are completely liquid. That's the glory of using the SoapQuick. There are no hard oils to melt. Even if I were using the traditional soaping method, I could still pour the lye mixture directly onto the solid oils without having to melt them completely. According to Old Crone's book, I could use my stick blender to help melt and mix everything. After blending the oils and lye in a few short bursts, I could see that my "soap" is starting to take shape. I've reached a slight trace at this point, and I've now added my fragrance oil (about 2 oz of Chocolate Truffle.) I'm not adding any color to the soap this time because my finished soap will darken over time due to the vanilla content. I also stopped using my stick blender at this point as once you've added your FO, you should only stir with your wooden spoon. Using the blender could accelerate trace in your soap and thicken it to the point where it's not pourable. You'd actually have to scoop it out. I've had this happen several times, and the soap turned out fine, it was just a damn mess trying to scoop it out of the bowl into the mold.
Speaking of molds, I bought a new one from my friend Julie over at Candles and Woodcrafts. I figured it was time I invested in a quality, wooden soap mold, and Julie's got a vast selection. I bought a pegged, wooden mold that would hold precisely 4 lbs of soap. I particularly like the pegged molds because the sides come completely off, and it is a bitch trying to line a soap mold-at least for me anyway. I lined the mold using freezer paper with the shiny side up. The only problem I had with the mold was getting the pegs in the holes after I lined the mold. I did leave a few out. Bad idea because I had a few leaks after I poured my mixture. With the soap in the mold, I covered the top with plastic wrap, wrapped a towel around it, then placed the wooden top over that. I did not want to set the top directly on the mold because it would have smushed down in my soap, and I wasn't about to have that!
I couldn't resist peaking at my soap after a few hours. One, I'm forever impatient, and two, I wanted to make sure I reached the gel phase which is the chemical process of your lye and oil mixture actually turning into soap. Yeah, I've reached the gel phase, and later, I'll unveil the finished product!


Wednesday, February 20, 2008
Bubblin Fun
Hey Ya'll,


You know that I'm a soap and candle maker (at least I'm trying to be anyway.) I haven't blogged about making candles yet because I'm currently ga-ga for soap. My mind is flooded with ideas. I'm working on a new line of cookie soaps that I hope won't turn out disastrous. I'll make a big reveal sometime next week. I will give you, my loyal fans (violins playing in the background), a sneak peek of a really easy-breezy recipe. It's called Cookie Dough Soap. It's so easy, you can make it with the kids (if you have any), or the gals, or the guys, you get the picture. I wanted to show you all pictures of the project in process, but I didn't get the idea til the very end, so for that, I apologize. Wear comfortable clothes, preferably something you won't mind getting dirty because it can get a little messy. First rule of thumb before embarking on any project: Have all your supplies together before you start. You will not have time to scramble around with mushy, soapy hands once you get started. Notice that I don't include a thermometer with this recipe. We're not using lye, oils, or water, so there's no real need for one. Let's get started! You will need the following:
- Microwave-safe bowl
- 16-24 oz of M&P soap (that's melt and pour for you novices) I personally like oatmeal M&P because it's already tan in color like cookie dough. If you don't have oatmeal soap, use white M&P as opposed to clear because you want the soap to have a "solid" appearance
- brown, skin-safe dye if you're using white M&P soap
- 1/2-1 oz of cookie dough fragrance oil (FO)
- wooden spoon
- freezer or parchment paper
- cellophane or plastic wrap
- ribbon or rapphia
- clean hands
- Cut the soap into small squares and toss into your bowl. This allows for even melting and shortens your melt time.
- Place bowl in your microwave and melt it in 30 second blasts. Do this at least 3 times. You could just zap the soap for a minute+, but all microwaves aren't the same and you could scorch or burn your soap. You don't want your soap piping hot. The goal is to melt it into liquid form. You may notice that your soap has an alcohol-y smell. That's okay. Once you add your FO, it will dissipate.
- The liquid soap will be hot, so if there are still some chunks, just stir it with your spoon so the chunks are incorporated into the liquid soap. If you still have a lot of chunks, blast it in 20 second bursts til it softens, then stir to melt it down.
- Now is the time to add your FO and dye. Stir well to incorporate.
- Now that your soap is liquified, you want it to form a "skin." That's when your soap begins to solidify. Now is the time to work quickly, but not like Speedy Gonzalez.
- Using your hands, you want to scoop some of the cooled mixture (that's important. The soap should be warm to the touch, but not so hot that you can't handle it) and begin to start forming balls with it. The size is totally up to you. You don't want perfect, round balls, but they should be textured and messy like real cookie dough. If the soap isn't firm enough, let it set for about 3 minutes or so. It doesn't take long to cool.
- Again, the consistency should be sticky and gooey. If it's too hard, zap it for about 10-15 seconds. Once your "dough" is formed, set it on your freezer or parchment paper so they can harden. I like to leave mine overnight so that it's really solid and hard. You don't want it to break apart as soon as you touch it.
- Once they've hardened, your soap is now ready to either use or package for gift-giving. You can wrap them in cellophane or plastic and tie a piece of ribbon or wrapphia around them. Here is a pic of my finished soap. Hope you have fun making yours. Smooches!


Sunday, February 17, 2008
SoapQuick-Day 3
Dearest Bubbleheads and Flamers,
My prediction came true-I totally ruined this batch for a number of reasons: I rushed the process because I was so eager to post to the blog. Soap making is a science. Why do I keep forgetting that? So what really went wrong? One, I don't think I measured my oils and lye properly. I've never worked with a pre-made batch of oils before, and I didn't take the time to do my calculations. Secondly, I didn't gauge my temperatures correctly. I think my oils were too warm for my lye solution, and I also think I used too much fragrance oil, and I didn't stir in my dye long enough (look at the color patches on top.) Lastly, I've got to stop using plastic to line my mold. My soap keeps seeping through the plastic and the plastic gets stuck in the "cracks." Friends, I'm not discouraged. I'm encouraged. Now that I've assessed all that went wrong, I'm going to try it again, but this time, I'm going to do it right. Here's a few pics of the soap from hell. Oh, but I have a consolation prize. Look at these cute chocolate drizzle bars I made. I'm going to be selling them on the Soap Seduction starting tomorrow. Be sure to pick up a bar or two-smells just like you're favorite candies.


BAD SOAP

My prediction came true-I totally ruined this batch for a number of reasons: I rushed the process because I was so eager to post to the blog. Soap making is a science. Why do I keep forgetting that? So what really went wrong? One, I don't think I measured my oils and lye properly. I've never worked with a pre-made batch of oils before, and I didn't take the time to do my calculations. Secondly, I didn't gauge my temperatures correctly. I think my oils were too warm for my lye solution, and I also think I used too much fragrance oil, and I didn't stir in my dye long enough (look at the color patches on top.) Lastly, I've got to stop using plastic to line my mold. My soap keeps seeping through the plastic and the plastic gets stuck in the "cracks." Friends, I'm not discouraged. I'm encouraged. Now that I've assessed all that went wrong, I'm going to try it again, but this time, I'm going to do it right. Here's a few pics of the soap from hell. Oh, but I have a consolation prize. Look at these cute chocolate drizzle bars I made. I'm going to be selling them on the Soap Seduction starting tomorrow. Be sure to pick up a bar or two-smells just like you're favorite candies.


BAD SOAP


GOOD SOAP
Thursday, February 14, 2008
SoapQuick-Day 2
Hello Flamers and Bubbleheads,


I think I totally screwed up this batch of soap for a number of reasons. One, I didn't stir the lye/oil mixture long enough. I only achieved a very light trace even after I added the fragrance. When I poured it, it was still very liquid-not the pudding consistency I'm used to. This was also my first time making the lye mixture the day before, and my swirling leaves little to be desired. I've just got issues. I think it's going to look like crap when it's all said and done. Tune in tomorrow. At least I've got Smallville tonight to take my mind off of things.


Wednesday, February 13, 2008
SoapQuick-Day 1
Hey Decadent Subjects,
Today is the day I embark on my latest soapmaking journey using this SoapQuick formula that I bought from Mission Peak Soaps. As the photos will show, I've laid out everything in preparation for the big day (tomorrow.) I usually make soap on the weekends cuz I have all day, but since I do have a real 9-5, I'm only preparing my lye solution today. If you've never made soap before, lye is no joke! It is nothing to screw around with. It will burn and/or eat your flesh alive if you do not take proper care when handling it. Always wear rubber gloves (shame on me for not wearing mine in this pic.) Always add the lye to your water (preferably distilled water). Never add water to your lye. It will cause a catastrophic eruption. When the lye and the water are mixed, it heats up to over 200 degrees. You can literally see the steam rising from your container and it smells all to be damned! Do not inhale this stuff. I've already mixed my solution, and now I'm going to let it sit for a day until it reaches room temperature (less than 100 degrees). Tune in tomorrow for Day 2. Oh yeah, I still can't decide on a scent. I'm thinking some kind of chocolate in honor of Valentine's Day.


Subscribe to:
Posts (Atom)